Engineering//16 min read
Training and serving PyTorch models in the Google Cloud with Vertex AI pipelines
A practical walkthrough from PyTorch training code to an automated pipeline on Google Cloud.
With each new feature Vertex AI is making it easier to put Machine Learning (ML) prototypes into production. Nowadays you do not really need to be a ML Ops expert anymore to develop production grade pipelines in the Google Cloud Platform (GCP).
However, while there are many tools in the GCP that make it easier for Data Scientists and ML Experts to do ML Ops, the variety of tools can be a bit overwhelming. Furthermore PyTorch is becoming more and more popular with each iteration and many google services still primarily support Tensorflow or at least make it much easier to implement something when the code is written in Tensorflow. Therefore I feel like a guide like this could help many PyTorch fans. It will give you step-by-step instructions on how to automatically train and deploy a PyTorch model in the GCP with Vertex AI pipelines. All code can be found here.
There is an older google blog post which helped me setting up the first pipeline but it doesn’t go too much in depth about many of the steps required for setting up such a pipeline. Nevertheless I want to share this article here as well: google blog post
Which GCP services do we need?
Before we start with the step-by-step guide, I will briefly go over all the GCP services I will use and what I will use them for. If you want to do a 1:1 implementation make sure you have access to these first. If you are familiar with the GCP you can probably skip this chapter. To get a first impression how these services are integrated in a pipeline I made a high level visualization.
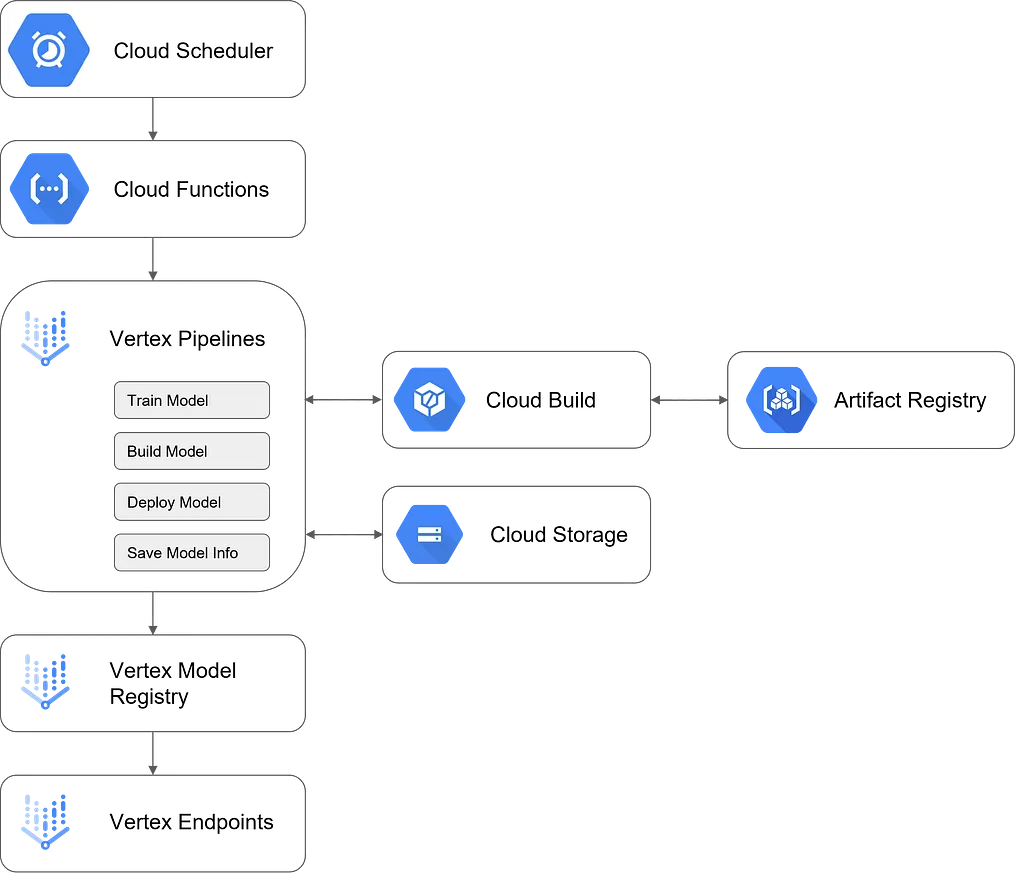
Vertex AI custom model training pipeline
Cloud Scheduler
A cron job scheduler which we will use to define a model training schedule. It can invoke any service with a http trigger functionality. We will use it to trigger a cloud function which will compile and run the Vertex AI pipeline.
Cloud Functions
The go-to service to run lightweight applications in the GCP. The main advantage compared to Cloud Run is that it does not require any boilerplate code to define container environments. We will use it as a pipeline initiator by setting up a Python function that triggers a Vertex AI pipeline with given hyperparameters.
Vertex AI
Vertex AI is an umbrella term for several GCP tools related to ML Ops. We will use five different Vertex AI tools:
- Pipelines
Vertex AI Pipelines is a tool to orchestrate ML workflows. It consists of one or more pipeline components, where each component is a self-contained set of code that performs one part of a pipeline’s workflow. The flow of the pipeline (i.e. which components are executed in what order) can be configured in Python using the Kubeflow SDK. You can use pre-built components or define your own and there are different ways to define custom components. For example you can create custom Python packages or just create a Python function for each component. You can read more about how to build components here. - Training
We won’t use a pipeline component for training our model but a Vertex AI training job. In a later chapter I will explain the reason why. - Tensorboard instance
Vertex AI TensorBoard instances can be used to log experiments. They are quite expensive (300 $ / month for one instance) and using them is completely optional as it is also possible to log experiments in some other custom way. - Model registry
Is a central location to manage and organize all you models and versions. If we want to expose a model as an endpoint or use it for batch prediction runs we need to first store it in the model registry. - Endpoints
We have two options to use our trained ML model for inference. Via batch prediction jobs or as a model endpoint which can do online-processing of single inference requests. For this tutorial we will expose the trained model as an endpoint. (HINT: When using Vertex AI endpoints it is important to consider the costs as the endpoint will be continuously online, and depending on the machine type this can get expensive.)
Cloud Build
Cloud build is a serverless CI/CD platform. We will use it to build the docker containers for our pipeline components.
Artifact Registry
Artifact registry is a place to manage container images which is exactly what we will use it for.
Cloud Storage
Cloud storage is the blob storage service in the GCP. It is also integrated with most other GCP tools to store artifacts and results and probably the GCP tool I use the most. For our pipeline we will use Cloud Storage for multiple purposes: storing training data, working directory for Vertex AI pipelines and storing outputs such as the trained model.
Building the pipeline
As the first part of our step-by-step guide, lets go over how we define our Vertex AI pipeline. For the definition we create a file “pipeline.py” containing component and flow definition. In our case we define each of the components as a function, the code for which is stored in separate subfolders within the directory containing “pipeline.py”. Additionally we need the Kubeflow SDK to define the pipeline steps. Our import section for “pipeline.py” looks like this:
from kfp import dsl
from kfp import components as comp

from .components.train_model.main import train_model
from .components.build_model.main import build_model
from .components.deploy_model.main import deploy_model
from .components.save_model_info.main import save_model_info
We then use the “create_component_from_func” function from the Kubeflow SDK to package each Python function as a component. For that we need to specify a Python version for the component as well as all required packages. Here is an example how this looks for the “train_model” component:
train_model_op_fun = (
    comp.create_component_from_func(
        train_model,
        packages_to_install=[
            "kfp==1.8.18",
            "fire==0.4.0",
            "gcsfs==2022.11.0",
            "google-cloud-aiplatform==1.20.0"
        ],
        base_image="python:3.9.16"
    )
)
Once we defined our components like this we need to specify the order in which these components should be executed in the pipeline. To do this we setup a main pipeline function with the Kubeflow decorator “@dsl.pipeline”. Here we can also define where additional input parameters to component functions are coming from. Using Kubeflow commands we furthermore define container hardware requirements for each container. It is important to note here is that we cannot use variables within the pipeline definition so the machine configuration needs to be hardcoded in the script. This can be an issue when we want to have a flexible pipeline which depending on the model architecture can run with different machine configurations. There is a workaround to this with Vertex AI which we will discuss in the next chapter where we look into each component in more detail.
train_model
def train_model(
    comp_params: dict
) -> NamedTuple('train_model_outputs', [
    ('DUMMY', str)
]):

    import argparse
    from google.cloud import aiplatform

    cfg = argparse.Namespace(**comp_params)

    # trainer image
    trainer_image_uri = f'{cfg.build_location}-docker.pkg.dev/{cfg.project_id}/{cfg.trainer_image_name}/{cfg.trainer_image_name}'

    trainer_args = [
        f'--base-dir={cfg.working_dir}',
        f'--model-dir={cfg.working_dir}/{cfg.model_dir}',
        f'--training-data-uri={cfg.bucket}/train_data/{cfg.language}/ds_train.csv',
        f'--validation-data-uri={cfg.bucket}/train_data/{cfg.language}/ds_validation.csv',
        '--data-format=gcs',
        f'--language={cfg.language}',
        f'--model_name={cfg.model_name}',
        f'--model_name_output={cfg.model_name_output}',
        f'--lr={cfg.lr}',
        f'--dropout={cfg.dropout}',
        f'--n_hidden={cfg.n_hidden}',
        f'--batch_size={cfg.batch_size}',
        f'--num_epochs={cfg.num_epochs}',
        f'--val_size={cfg.val_size}',
        f'--output_file_label_map={cfg.output_file_label_map}'
    ]

    try:
        debug = eval(cfg.debug.lower())
    except (NameError, AttributeError) as e:
        print(repr(e))
        debug = False
    if debug: trainer_args.append('--debug')

    tensorboard_resource_name = f'projects/{cfg.project_id}/locations/{cfg.model_location}/tensorboards/{cfg.tensorboard_id}'

    aiplatform.init(project=cfg.project_id, location=cfg.model_location, staging_bucket=cfg.bucket)

    display_name_parts = [
        cfg.dt,
        cfg.language,
        cfg.model_name,
        cfg.batch_size,
        cfg.lr
    ]
    job = aiplatform.CustomContainerTrainingJob(
        display_name = "_".join([str(x) for x in display_name_parts]),
        container_uri = trainer_image_uri + ':latest'
    )

    model = job.run(
        args = trainer_args,
        base_output_dir = cfg.working_dir,
        replica_count = int(cfg.trainer_replica_count),
        machine_type = cfg.trainer_machine_type,
        accelerator_type = cfg.trainer_gpu_type,
        accelerator_count = int(cfg.trainer_n_gpu),
        tensorboard = tensorboard_resource_name,
        service_account = cfg.service_account,
        sync = True
    )

    return ("DONE",)
As the name suggests the train_model component performs model training based on the provided training data. One challenge we have here is that we would like to be able to train an arbitrary model and different model architectures have different hardware requirements for training. As we found out in the previous chapter container machine configurations need to be hardcoded in the “pipeline.py” script and it is not possible to pass values through variables. A workaround for this is that we define a “meta” container which executes a Vertex AI training job using the aiplatform.CustomContainerTrainingJob class. This class allows us to define variable hardware requirements for the training job and itself creates and runs another container. The architecture looks something like this:
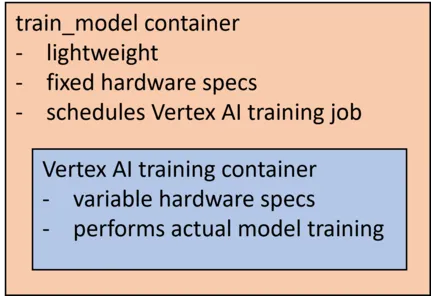
The two main components of the train_model container are:
- Defining a list of arguments to pass to the Vertex AI training pipeline
- Initiating and running a Vertex AI custom container training job
Within the train_model component folder you will find a subfolder “trainer_image”. This directory contains all information needed to build the container for the Vertex AI training job. There are already quite a few tutorials out there on how to do custom training in Vertex AI so I won’t go too much in detail about the structure here (for example).
In our example the code instantiates and trains a PyTorch model. We also do not have all our code stored in a single file but, as is usually the case with production grade ML pipelines, have a subdirectory “helpers” with additional .py files. This will become important in the next chapter when we create our container for model serving.
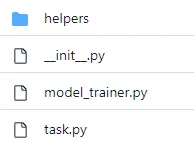
code directory within Vertex AI training container
Once finished, the Vertex AI training job saves all model files into a specified Google Cloud Storage bucket.
build_model
def build_model(
    comp_params: dict,
) -> NamedTuple('build_model_outputs', [
    ('endpoint_image_uri', str),
    ('commit_sha', str)
]):

    import os
    import argparse
    from google.cloud.devtools import cloudbuild

    cfg = argparse.Namespace(**comp_params)

    endpoint_image_uri = f"{cfg.build_location}-docker.pkg.dev/{cfg.project_id}/{cfg.endpoint_image_name}/{cfg.endpoint_image_name}_{cfg.language}"

    client = cloudbuild.CloudBuildClient()

    request = cloudbuild.RunBuildTriggerRequest(
        project_id = cfg.project_id,
        trigger_id = cfg.trigger_name,
        # https://cloud.google.com/python/docs/reference/cloudbuild/latest/google.cloud.devtools.cloudbuild_v1.types.RepoSource
        source = {
            "branch_name": cfg.repo_branch,
            "dir_": cfg.build_dir,
            "substitutions": {
                "_IMG_URI": endpoint_image_uri,
                "_MODEL_DIR": f"{cfg.working_dir}/{cfg.model_dir}",
                "_TRAINER_CODE_DIR": cfg.trainer_code_dir,
                "_BUILD_DIR": cfg.build_dir,
                "_MODEL_NAME": cfg.endpoint_model_name,
                "_LABEL_MAP_FILE": cfg.output_file_label_map
            }
        }
    )

    operation = client.run_build_trigger(request=request)

    response = operation.result()

    return (endpoint_image_uri, response.substitutions["COMMIT_SHA"])
Once our model is trained, what we want to do is package it into a container so that it can be used by Vertex AI for inference. There is a list of prebuilt container images that can be used for model serving in Vertex AI.
Dockerfile
Unfortunately at least at the time of writing the pre-built container images for PyTorch did not contain the transformers library thus making them unusable for many NLP tasks. We therefore need to define a custom container image for PyTorch model serving. In the following I will explain in detail how to set up a Dockerfile for such a container.
PyTorch models are served via TorchServe, therefore we pull the latest base image. Since we might want to use a gpu also for inference we pull an image with gpu support.
FROM pytorch/torchserve:latest-gpuWe will user the root user to upgrade pip and setuptools to the latest version (some commands can only be executed by the root user).
USER root
RUN pip3 install --upgrade pip
RUN pip3 install --upgrade setuptools
USER model-server
We then copy training outputs into the model-server directory which is the directory for TorchServe. Training outputs were previously copied into the build directory from the Cloud Storage bucket (outputs of training run) by running the script “copy_artifacts.sh”. To instantiate and use the model in our TorchServe container we also need the helpers directory from our model training code base. To be able to use all files in this directory with TorchServe without explicitly listing them in the Dockerfile we create a zip archive. The reason for this is that when running the torch-model-archiver command later we cannot set an entire directory as the value in the –extra-files argument.
COPY ./custom_handler.py /home/model-server/
COPY ./model.pt /home/model-server/
COPY ./helpers.zip /home/model-server/
COPY ./label_map.json /home/model-server/
# copy_artifacts.sh
gsutil -m cp -r $_MODEL_DIR/* $_BUILD_DIR/.
mv `ls $_BUILD_DIR/*.pt | head -1` $_BUILD_DIR/model.pt
mv $_BUILD_DIR/$_LABEL_MAP_FILE $_BUILD_DIR/label_map.json
cp -r $_TRAINER_CODE_DIR/helpers $_BUILD_DIR/helpers
pushd $_BUILD_DIR; zip -r helpers.zip helpers; popd
echo `ls $_BUILD_DIR`
echo "copied artifacts to build dir"Next we define the serving configuration such as health check and prediction listener ports for TorchServe and store it in a file named “config.properties”.
# create torchserve configuration file
USER root
RUN printf "\nservice_envelope=json" >> /home/model-server/config.properties
RUN printf "\ninference_address=http://0.0.0.0:7080" >> /home/model-server/config.properties
RUN printf "\nmanagement_address=http://0.0.0.0:7081" >> /home/model-server/config.properties
USER model-server

# expose health and prediction listener ports from the image
EXPOSE 7080
EXPOSE 7081
We now run the torch-model-archiver command to package all model artifacts into a single model archive file. As mentioned above we list the “helpers.zip” archive as an extra file so it is available to us in the serving container. The model archive is saved in the “model-store” directory as “$_MODEL_NAME.mar”.
# create model archive file packaging model artifacts and dependencies
RUN torch-model-archiver -f \
    --model-name=$_MODEL_NAME \
    --version=1.0 \
    --serialized-file=/home/model-server/model.pt \
    --handler=/home/model-server/custom_handler.py \
    --extra-files "/home/model-server/helpers.zip,/home/model-server/label_map.json" \
    --export-path=/home/model-server/model-store
Finally we launch a TorchServe HTTP server to enable serving of the model referencing the configuration properties and the model archive file. As an alternative to “all” we could specify the model archive file directly like “$_MODEL_NAME=$_MODEL_NAME.mar”.
# run Torchserve HTTP serve to respond to prediction requests
CMD ["torchserve", \
    "--start", \
    "--ts-config=/home/model-server/config.properties", \
    "--models", \
    "all", \
    "--model-store", \
    "/home/model-server/model-store"]
Model Handler
An important component we need for TorchServe is a Python script that you package with the model when you use the model archiver. TorchServe executes this code when it runs. This script performs the following functions:
- Initialize the model instance
- Pre-process input data before it is sent to the model for inference
- Customize how the model is invoked for inference
- Post-process output from the model before sending back a response
TorchServe provides a BaseHandler class which provides methods for all of this functionality. We can inherit from this base class and override the methods with our own custom code. The handler receives two types of input:
- data — the input data from the incoming request
- context — the TorchServe context. You can use the following information for customization: model_name, model_dir, manifest, batch_size, gpu etc.
Below is the code for our custom handler class
import zipfile
with zipfile.ZipFile("helpers.zip","r") as zip_ref:
    zip_ref.extractall(".")

import json
import os
import logging
import torch
from ts.torch_handler.base_handler import BaseHandler
from transformers import BertTokenizer

from os import listdir
from os.path import isfile, join

from helpers.model import BertClf


class ModelHandler(BaseHandler):
    """
    A custom model handler implementation.
    """

    def __init__(self):
        super(ModelHandler, self).__init__()
        self.initialized = False
        self.manifest = None
        self.model = None
        self.device = None

    def initialize(self, context):
        """
        Loads the model.bin file and initializes the model object.
        Instantiates Tokenizer for preprocessor to use
        Modify the self.model = ... line to load the model in a
        correct manner.
        """

        # Parse context and set attributes
        self.manifest = context.manifest
        serialized_file = self.manifest["model"]["serializedFile"]
        properties = context.system_properties
        model_dir = properties.get("model_dir")

        # Set device to GPU if cuda available else CPU
        self.device = torch.device("cuda" if torch.cuda.is_available() else "cpu")

        # Find .bin or .pt file
        model_path = os.path.join(model_dir, serialized_file)
        if not os.path.isfile(model_path):
            raise RuntimeError("Missing the model.pt or pytorch_model.bin file")

        # Load model
        self.model = BertClf.load_checkpoint(model_path)
        self.model.to(self.device)
        self.model.eval()

        # Load tokenizer
        self.tokenizer = BertTokenizer.from_pretrained(self.model.model_name)

        # load mapping file
        with open("label_map.json", "r") as f:
            self.label_map = {int(k):v for k,v in json.load(f).items()}

        self.initialized = True


    def preprocess(self, data):
        """
        Transform raw input into model input data.
        Args:
            batch: list of raw requests, should match batch size
        Returns:
            list of preprocessed model input data
        """
        print(f"input data:\n{data}")

        texts = []
        for i,d in enumerate(data):
            texts.append(d.get("text"))

        text_inputs = self.tokenizer(
            texts, padding=True, truncation=True, return_tensors="pt"
        )

        return text_inputs


    def inference(self, text_inputs):
        """
        Internal inference methods
        Args:
            model_input: preprocessed model input data
        Returns:
            list of inference output in NDArray
        """

        with torch.no_grad():
            return self.model(
                input_ids=text_inputs['input_ids'].to(self.device)
            ).cpu()


    def postprocess(self, model_output, data):
        """
        Return postprocessed inference result.
        Args:
            inference_output: list of inference output
        Returns:
            list of postprocessed results
        """
        prediction = [[self.label_map[i] for i, logit in enumerate(logits) if logit>0] for logits in model_output]

        processed_prediction = []
        for i,p in enumerate(prediction):
            d = {
                "pred": p,
                "pred_raw": model_output[i].tolist(),
                "id": data[i].get("id")
            }
            processed_prediction.append(d)

        return processed_prediction


    def handle(self, data, context):
        """
        Invoked by TorchServe for prediction request.
        Do pre-processing of data, prediction using model and postprocessing of prediciton output
        Note that this function can be omitted.
        Args:
            data: Input data for prediction
            context: Initial context contains model server system properties.
        Returns:
            prediction output
        """
        text_inputs = self.preprocess(data)
        model_output = self.inference(text_inputs)
        return self.postprocess(model_output, data)
Since we had to create a zip archive for the helpers directory to pass it to the model archiver we need to now unzip it to be able to import from it. I won’t go into more detail for the code of the handler class here as I think most of it is self explanatory.
Setting up the Dockerfile and custom handler are the most complicated parts for this step. In our “main.py” file (shown above) we simply run a build trigger which we defined in Google Cloud Build using the Cloud Build Python SDK. The resulting TorchServe container image uri and the commit_sha are passed to the next step.
deploy_model
def deploy_model(
    comp_params: dict,
    endpoint_image_uri: str,
    commit_sha: str
) -> NamedTuple('deploy_model_outputs', [
    ('model_resource_name', str)
]):

    import argparse
    from google.cloud import aiplatform

    cfg = argparse.Namespace(**comp_params)

    aiplatform.init(project=cfg.project_id, location=cfg.model_location)

    model_kwargs = {
        "serving_container_image_uri": endpoint_image_uri + ":" + commit_sha,
        "serving_container_predict_route": f"{cfg.endpoint_predict_route}/{cfg.endpoint_model_name}",
        "serving_container_health_route": cfg.endpoint_health_route,
        "serving_container_ports": [7080]
    }

    try:
        parent_model = [x for x in aiplatform.Model.list() if x.display_name == cfg.endpoint_model_name][0]
        model_kwargs["parent_model"] = parent_model.resource_name
    except IndexError:
        model_kwargs["display_name"] = cfg.endpoint_model_name

    model = aiplatform.Model.upload(**model_kwargs)

    endpoint = aiplatform.Endpoint.create(
        display_name = cfg.endpoint_model_name,
        project = cfg.project_id,
        location = cfg.model_location
    )

    model.deploy(
        endpoint = endpoint,
        deployed_model_display_name = cfg.endpoint_model_name,
        machine_type = cfg.endpoint_machine_type
    )

    return (model.resource_name,)
Almost all of the heavy lifting for this pipeline was done by the train_model and build_model components. For deploying the model we run some commands from the Vertex AI Python SDK to upload the model to the model registry, create an endpoint and deploy the model to it. There is also pre-built components that could be used for these steps.
save_model_info
def save_model_info(
    comp_params: dict,
    model_info: dict,
    model_resource_name: str
) -> NamedTuple('save_model_info_outputs', [
    ('DUMMY', str)
]):

    import argparse
    import json
    from google.cloud import storage as gcs

    cfg = argparse.Namespace(**comp_params)

    model_info["model_resource_name"] = model_resource_name

    client = gcs.Client(project=cfg.project_id)
    bucket_name = cfg.bucket.split("gs://")[-1]
    bucket = client.bucket(bucket_name)

    # contains information for latest model
    target_dir = f"{cfg.model_info_dir}/{cfg.language}/{cfg.language}_{{}}"
    # working dir of current training run
    wd = f"{cfg.working_dir[len(cfg.bucket)+1:]}/{{}}"

    # copy mapping objects created during training to model info dir
    # https://cloud.google.com/storage/docs/copying-renaming-moving-objects#storage-copy-object-python
    blob_model_info = bucket.blob(wd.format(cfg.output_file_model_info))
    blob_model_info.upload_from_string(json.dumps(model_info))
    bucket.copy_blob(blob_model_info, bucket, target_dir.format(cfg.output_file_model_info))

    return ("DONE",)
In a last step we store some information about parameters used to train the model as well as the model registry resource name to a file in Google Cloud Storage. This way we can always just have a look into this file to know which is the latest model we should use for inference.
Inference
Once we deployed our model to an endpoint we can use it for inference. Either through the UI:
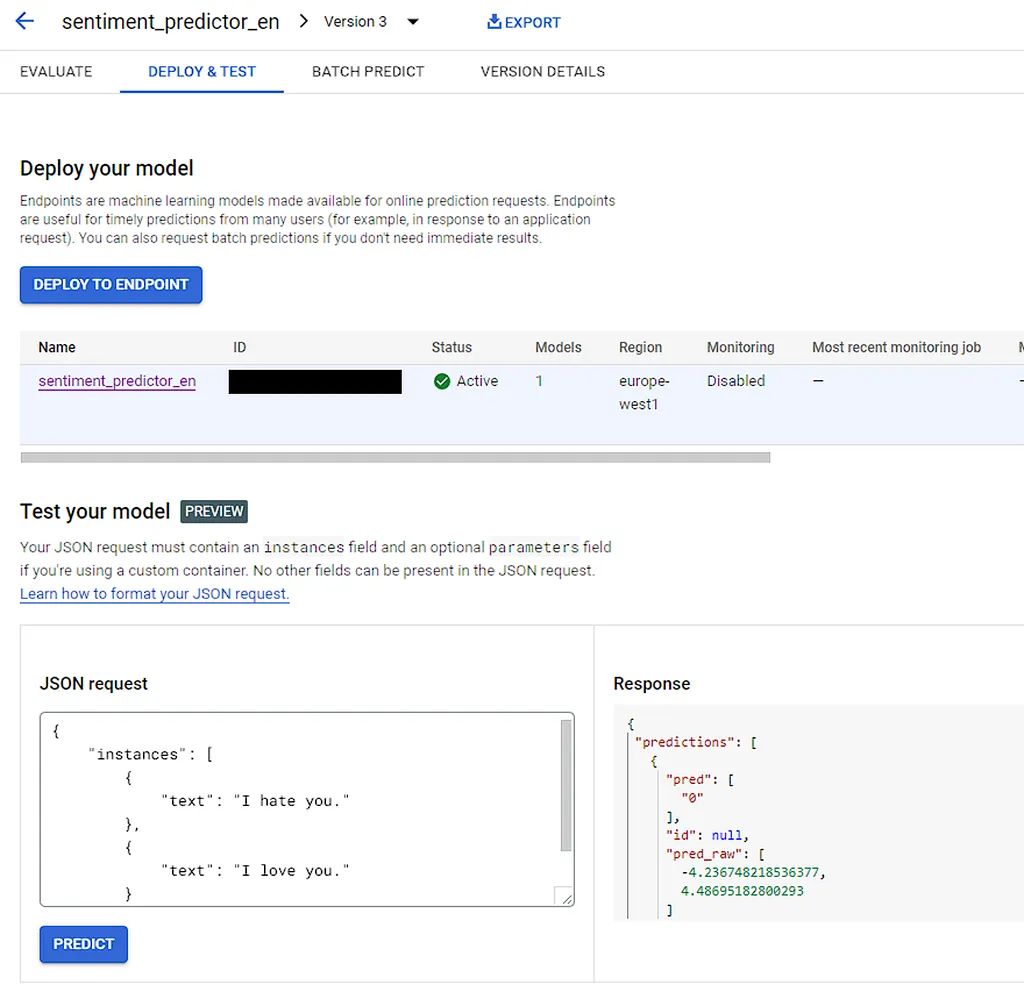
or alternatively you can use the Python SDK:
from google.cloud import aiplatform

def endpoint_predict_sample(
    project: str, location: str, instances: list, endpoint: str
):
    aiplatform.init(project=project, location=location)

    endpoint = aiplatform.Endpoint(endpoint)

    prediction = endpoint.predict(instances=instances)
    print(prediction)
    return prediction

project = ""
location = ""
endpoint = ""

instances = [{"text": "I hate you."}, {"text": "I love you."}]

endpoint_predict_sample(project, location, instances, endpoint)
Conclusion
The goal of this article is to help others to get a PyTorch training pipeline to run on Google Vertex AI. There are a few building blocks that I had trouble figuring out at first and I hope by using my code as a template to build off of others wont have the same problems.
I should note that my implementation is focused on showcasing custom training with Pytorch and leaves out important ML Ops topics such as model testing and validation or hyperparameter tuning (which can all be integrated in Vertex AI workflows). Furthermore I am aware that for the topics, which I did include, my implementation definitely is not perfect and has room to improve. Therefore I am always happy about suggestions for improvements in the comments!
This article is the first in a two part series. In the next article I will show you how to integrate the model we trained in an automated prediction pipeline. See you there!
For everyone who just scrolled to the bottom right away, here is the git repository again on which this article is based on: https://github.com/sirluk/vertex_ai_pytorch